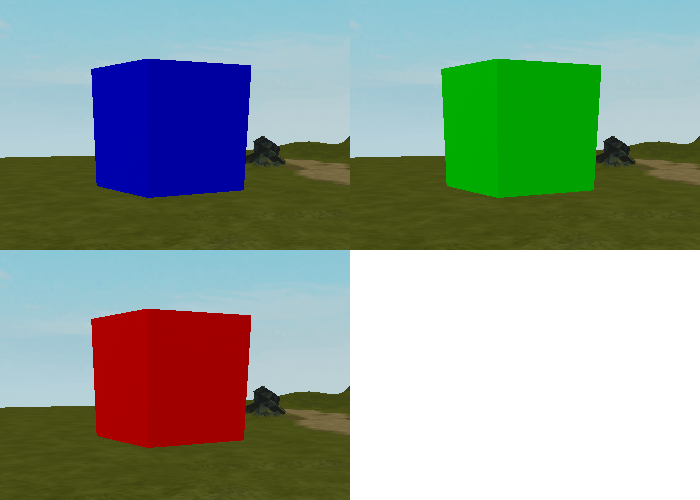
このプロジェクトでは、パーツに触れたときの色に応じてポイントが増えたり減ったりするパーツを作成します。ポイントはリーダーボードに表示します。
青の場合はプレイヤーに数ポイント与えられます。緑色の場合、たくさんのポイントが得られます。赤の場合はポイントを奪います。
プロジェクトの設定
ポイント付与部分は、ポイントが関連する様々なゲームに応用できます。例えば、プレイヤーがポイントを集めるアドベンチャー ゲームなどに利用できるでしょう。
リーダーボードの作成
このプロジェクトを作成するには、ポイントを表示するリーダーボードと、色が変化するパーツが必要です。リーダーボードを追加するプログラムは下記の通りです。現時点ではプログラムの意味を理解しなくても構いません。そのまま入力してください。
- ServerScriptServiceにスクリプトを追加します。PlayerSetup という名称にしましょう。リーダーボードは、Player の下に「leaderstats」という名称のフォルダを作成することで表示されます。
-- リーダーボードは各プレイヤーごとに作成する
local function onPlayerJoin(player)
    local leaderstats = Instance.new("Folder")  -- フォルダの作成
    leaderstats.Name = "leaderstats"            -- この名称を使うとリーダーボードとして表示される
    leaderstats.Parent = player                 -- player を親にする

    local points = Instance.new("IntValue")     -- 整数値を格納するオブジェクトを作成
    points.Name = "Points"                      -- この名称がリーダーボードに表示される
    points.Value = 0                            -- 初期値は0
    points.Parent = leaderstats                 -- leaderstatsを親にする
end

-- プレイヤーが入室してきた際に発生するイベントに接続
game.Players.PlayerAdded:Connect(onPlayerJoin)
色変化パーツ
パーツの色を、赤…緑…青と変化させます。
- パーツを作成し名前を PointPart にします。その下に PointScript という名前のスクリプトを追加します。
- PointPart にアクセスしやすいように pointPart という変数に入れておきます。
local pointPart = script.Parent- 赤、緑、青のオブジェクトを予め作成しておき変数に入れておきます。こちらは以前行いましたね。
- 青(少ないポイント加算): (R0, G0, B255)
- 緑(多いポイント加算): (R0, G255, B0)
- 赤(ポイント減算): (R255, G0, B0)
local pointPart = script.Parent

-- 色
local blue = Color3.fromRGB(0, 0, 255)
local green = Color3.fromRGB(0, 255, 0)
local red = Color3.fromRGB(255 ,0, 0)- 少量のポイント、大量のポイント、減算するポイントを設定します。
-- 色
local blue = Color3.fromRGB(0, 0, 255)
local green = Color3.fromRGB(0, 255, 0)
local red = Color3.fromRGB(255 ,0, 0)

-- 各ポイントの値
local smallPoints = 10
local largePoints = 50
local losePoints = 100
Playersサービスの取得
リーダーボードにアクセスするには、Explorer の Players にアクセスする必要があります。game:GetService() を使用することで、Playersサービスを取得することができます。ちなみに「game.Players」としても同じですが、GetService() を使用した方がより安全ということでこのようにします。
- 次のように入力して Players サービスを取得します。 「local Players = game:GetService(“Players”)」
-- 各ポイントの値
local smallPoints = 10
local largePoints = 50
local losePoints = 100

-- Playersサービスの使用
local Players = game:GetService("Players")
関数とイベント
PointsScript には 2 つの関数が必要です。ポイントを加算したり減算したりする関数と、プレーヤーがパーツに触れたときに実行される関数です。
- givePoints() という名前の新しい関数します。パラメータはplayerです。テスト用に print 文を入れておきましょう。
local Players = game:GetService("Players")

-- ポイントの加算と減算
local function givePoints(player)
    print("Giving player points")
end- その下に、 otherPartという名前のパラメーターを持つpartTouched()という名前の 2 番目の関数を作成します。
-- ポイントの加算と減算
local function givePoints(player)
    print("Giving player points")

end

-- プレイヤーがパーツに触れたかどうかをチェックする
local function partTouched(otherPart)

end- Playersサービスには、キャラクターモデルを渡すと、Playerオブジェクトを返してくれる便利な関数があります。それが、GetPlayerFromCharacter() です。この関数に与えた引数がキャラクターモデルだった場合、Player オブジェクトを返します。
-- プレイヤーがパーツに触れたかどうかをチェックする
local function partTouched(otherPart)
    -- 触れたパーツから、Player オブジェクトを取得
    local player = Players:GetPlayerFromCharacter(otherPart.Parent)

end- プレイヤーがパーツに触れた場合、player変数にオブジェクトが格納されます。そうでない場合、変数は空のままになります。
- 関数内で、player に値が入っているかどうかを確認します。入っている場合は、givePoints() を呼び出します。
- 関数の下で、partTouched() を pointPart の Touched イベントに接続します。
-- プレイヤーがパーツに触れたかどうかをチェックする
local function partTouched(otherPart)
    -- 触れたパーツから、Player オブジェクトを取得
    local player = Players:GetPlayerFromCharacter(otherPart.Parent)
    if player then
        givePoints(player)
    end
end

pointPart.Touched:Connect(partTouched)- テスト実行します。プレイヤーがパーツに触れるたびに、出力ウィンドウに「Giving player points」というメッセージが表示されます。
トラブルシューティング
- game:GetService(“Players”)の「Players」の第1文字目は大文字になっていますか?
- partTouched()は、pointPart のTouchedイベントに接続していますか?
ループするカラーの作成
随時、色を変化させるために while ループを使用します。パーツの色を数秒ごとに変更します。この while ループの条件は true にしているため無限に実行できます。
- スクリプトの最後に、条件が true である新しい while ループを作成します。これは、ループが常に実行されることを意味します。
-- プレイヤーがパーツに触れたかどうかをチェックする
local function partTouched(otherPart)
    -- 触れたパーツから、Player オブジェクトを取得
    local player = Players:GetPlayerFromCharacter(otherPart.Parent)
    if player then
        givePoints(player)
    end
end

pointPart.Touched:Connect(partTouched)

-- 色を変化させる無限ループ
while true do

end
while true do ループがスクリプトの最後にない場合、それより下のコードは実行されません。while ループは、停止しないため、do から end の間を実行し続けます。
- 予め作成しておいた変数を使い、パーツのColorプロパティに代入します。色を変えた後はtask.wait() 関数を使い数秒待ちます。これで、青、緑、赤の3色が無限に切り替わります。
-- 3色でループし、各色の間で待機する
while true do
    pointPart.Color = blue
    task.wait(3)
    pointPart.Color = green
    task.wait(2)
    pointPart.Color = red
    task.wait(1)
end- テスト実行し、3 色すべてがループすることを確認します。

トラブルシューティング
この時点で、3色が切り替わらない場合は、次の項目を確認してください。
- while ループがスクリプトの一番下、Touched イベントの下にありますか?ループが一番下にないと、スクリプトの他の部分が正しく実行されません。
- Color3.fromRGB()内の各色が正しく記述されていますか?(255, 50, 0) のように、カンマで区切られた 0 から 255 までの 3 つの数値が必要です。
プレイヤーにポイントを与える
プレーヤーは、パーツに触れたときの現在の色に基づいてポイントが与えられます。
現在の色を見つける
触れたときの色によってプレイヤーに与えるポイントが決定されますので、現在の色を取得しておきます。
- givePoints() にある print 文を削除し、パーツ(pointPart)の現在の色を取得します。currentColor 変数は、プレイヤーが獲得する (または失う) ポイント数を決定します。
local function givePoints(player)
    local currentColor = pointPart.Color
end- プレーヤーのポイントはリーダーボードに表示しますので、そのオブジェクトを取得します。リーダーボードにアクセスするには、player の 子供である leaderstats を取得すれば良いわけです。
local function givePoints(player)
    local currentColor = pointPart.Color

    local playerStats = player:WaitForChild("leaderstats")
end- leaderstats の子供に Points という整数値を保存するオブジェクトを追加しましたね。このオブジェクトにポイントが入っていますので、これを playerPoints という変数に入れておきます。
local function givePoints(player)
    local currentColor = pointPart.Color

    local playerStats = player:WaitForChild("leaderstats")
    local playerPoints = playerStats:WaitForChild("Points")
end
ポイントの付与または減算
次に、if と elseif を使用して、触れた部分の色に応じてポイントを加算または減算します。青は少量、緑は多量のポイントを加算し、赤はポイントの減点になります。
- まず、青を判定しましょう。if 文を使用して現在の色が青かどうかを確認し、そうであれば、プレーヤーの現在のポイント値に smallPoints を加算します。
local function givePoints(player)
    local currentColor = pointPart.Color

    local playerStats = player:WaitForChild("leaderstats")
    local playerPoints= playerStats:WaitForChild("Points")

    if currentColor == blue then
        playerPoints.Value = playerPoints.Value + smallPoints
    end

end- 次に、緑を確認します。緑は、else if 文を使用します。緑色の場合、プレーヤーの現在のポイント値に largePoints を加算します。
if currentColor == blue then
    playerPoints.Value = playerPoints.Value + smallPoints
elseif currentColor == green then
    playerPoints.Value = playerPoints.Value + largePoints
end- pointsPart が青でも緑でもない場合は、赤のはずです。else 文を使用してポイントを減算します。
if currentColor == blue then
    playerPoints.Value = playerPoints.Value + smallPoints
elseif currentColor == green then
    playerPoints.Value = playerPoints.Value + largePoints
else
    playerPoints.Value = playerPoints.Value - losePoints
end- 最後に、パーツを削除します。これを行わないと、何回もパーツに触れてしまいポイントがたくさん加算されたり、減算されてしまいます。最も簡単な方法はパーツを削除することです。Destroy() を使用してパーツを消去します。
if currentColor == blue then
    playerPoints.Value = playerPoints.Value + smallPoints
elseif currentColor == green then
    playerPoints.Value = playerPoints.Value + largePoints
else
    playerPoints.Value = playerPoints.Value - losePoints
end

pointPart:Destroy()- テストプレイを行い、各色が期待通りのポイントになるのかを確認します。青、緑、赤の3 つの条件すべてをテストしてください。
プレイヤーへのフィードバック
PointPart は機能しますが、リーダーボードをたまたま見ない限り、プレイヤーは何が起こったのか気付かない可能性があります。PointPart が破棄されたときにパーティクル(粒子)を出現させ演出してみましょう。その他の演出効果としては、音を鳴らす、揺らすなど、何らかのエフェクトを加える等があります。それらを行うことでプレイヤーに満足感が与えられるでしょう。
パーティクル エフェクトの作成
パーティクル(粒子)エフェクトは、触れたパーツと同じ色にします。
- GivePoints () の最下部で、ParticleEmitter オブジェクトを作成します。大文字小文字の区別がありますので確認してください。
    local particle = Instance.new("ParticleEmitter")
end- ParticleEmitters の Color は、グラデーション等もサポートしているため、ColorSequence 型のデータしか入れることができません。そこで、現在の色(currentColor)を ColorSequence 型に変更しなくてはなりません。Color3型を作成できたように、ColorSequence 型も簡単に作成できます。ColorSequence.new(currentColor) とすればOKです。
pointPart:Destroy()

-- パーティクルの作成
local particle = Instance.new("ParticleEmitter")
particle.Color = ColorSequence.new(currentColor)- パーティクルは、プレイヤーの頭の部分から出力したいと思います。プレイヤーモデルの中に、Headというパーツが入っていますので、それが頭になります。パーティクルの親をそれに設定すれば頭から出力されます。
local particle = Instance.new("ParticleEmitter")
particle.Color = ColorSequence.new(currentColor)

local playerCharacter = player.Character
particle.Parent = playerCharacter:WaitForChild("Head")- 出力したパーティクルは1秒後に消したいので、task.wait(1) を実行してからそれを破棄します。
local particle = Instance.new("ParticleEmitter")
particle.Color = ColorSequence.new(currentColor)

local playerCharacter = player.Character
particle.Parent = playerCharacter:WaitForChild("Head")

task.wait(1)
particle:Destroy()- ゲームをテストし、各色に触れた後、パーティクルがプレーヤーに短時間追従することを確認します。
トラブルシューティング
この時点で、パーティクルが思ったように機能しない場合は、次のいずれかを試してください。
- Instance.new のパラメータは文字列で指定します。ですから、ParticleEmitter は引用符(ダブルコーテーション)で囲む必要があります。
- particle.Parent に代入するものは、「playerCharacter:WaitForChild(“Head”)」です。 playerCharacter とWaitForChild(“Head”)の間にはスペースを入れずに「:」のみを使用してください。
完成したプログラム
local pointPart = script.Parent

local blue = Color3.fromRGB(0, 0, 255)
local green = Color3.fromRGB(0, 255, 0)
local red = Color3.fromRGB(255 ,0, 0)

local smallPoints = 10
local largePoints = 50
local losePoints = 100

local Players = game:GetService("Players")

local function givePoints(player)
    local currentColor = pointPart.Color

    local playerStats = player:WaitForChild("leaderstats")
    local playerPoints = playerStats:WaitForChild("Points")

    -- パーツの色に応じたポイントを加減算
    if currentColor == blue then
        playerPoints.Value = playerPoints.Value + smallPoints
    elseif currentColor == green then
        playerPoints.Value = playerPoints.Value + largePoints
    else
        playerPoints.Value = playerPoints.Value - losePoints
    end

    -- パーツを破壊する
    pointPart:Destroy()

    -- パーティカルエフェクトを作成し、1秒後にそれを破壊する
    local playerCharacter = player.Character
    local particle = Instance.new("ParticleEmitter")
    particle.Color = ColorSequence.new(currentColor)
    particle.Parent = playerCharacter:WaitForChild("Head")
    task.wait(1)
    particle:Destroy()
end

local function partTouched(otherPart)
    local player = Players:GetPlayerFromCharacter(otherPart.Parent)

    if player then
        givePoints(player)
    end
end

pointPart.Touched:Connect(partTouched)

-- 3色でループし、各色の間で待機する
while true do
    pointPart.Color = blue
    task.wait(4)
    pointPart.Color = green
    task.wait(3)
    pointPart.Color = red
    task.wait(2)
end3 thoughts on “3-5 else/if の練習ーポイントを与える”
コメントを残す
コメントを投稿するにはログインしてください。

初心者ですがいつも拝見させていただいてます!
質問なのですが、このプログラムを維持しつつ、同時にスピードを上げるプログラムを導入すると、どのようなプログラムになるでしょうか?
以前紹介なさっていたページを参考にしているのですが、中々上手くいきません…。
お時間がありましたら、回答よろしくお願いいたします。
ありがとうございます!
どのタイミングでスピードを上げるのでしょうか?
例えば、上記の「パーツ」に触れたらスピードを上げるのでしたら、
下記のページが参考になると思います。
https://roblox-jp.com/reference/humanoid-speedup/
また、時間経過と共に徐々にスピードを上げたいのなら、バックグラウンドでプレイヤーを監視し、
スピードを上げて行く方法を採用します。
バックグラウンドで処理を行う場合うは、RunServiceを使うのが一般的ですがspawnも使用できます。
https://create.roblox.com/docs/ja-jp/reference/engine/classes/RunService
以下のプログラムは、1秒ごとに全プレイヤーのスピードを1アップします。
spawn(function()
while wait(1) do
for _,player in pairs(game.Players:GetPlayers()) do
local character = player.Character
local humanoid = character:FindFirstChild(“Humanoid”)
if humanoid then
humanoid.WalkSpeed += 1
end
end
end
end)
HumanoidのWalkSpeedの値を増やせばスピードが上がりますが、どのタイミングで上げるのか。
またスピードを元に戻さなくてはならい場合は、どのタイミングで戻すのかを考えなくてはなりません。
参考になりました! ありがとうございました。
これからも頑張ってください!