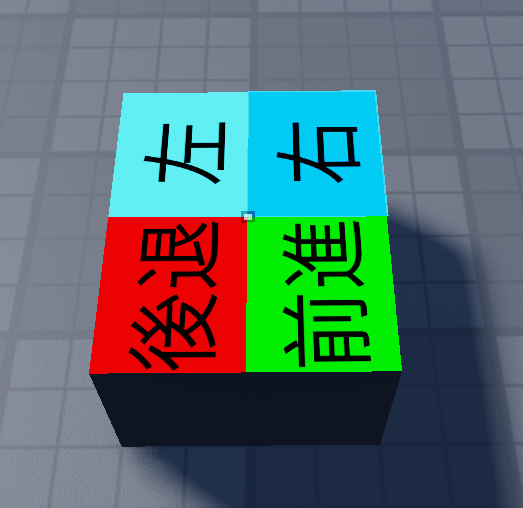
Seat はプレイヤーが着席する特殊なパーツです。1つの Seat だけで作成した超簡単な乗り物を作ってみました。シンプルながら、前進、後退、右回転、左回転ができます。
- Workspace にSeat を追加します。
- Seat の中に、AngularVelocity、Attachment、LinearVelocity、SurfaceGui を追加します。
- SurfaceGui の中に、Script と、4つの TextButton を追加します。
- TextButton の名称をそれぞれ SpeedUp、SpeedDown、LeftTurn、RightTurn に変更します。
- TextButtonの配置と表示文字を下記のように分かるようにします。

- AngularVelocity の Attachment0 に「Attachment」を設定し、MaxTorgue に「100000」を設定します。
- LinearVelocity の Attachment0 に「Attachment」を設定し、MaxForce に「10000」を設定します。
- Script に入れるプログラムは以下の通りです。
local gui = script.Parent
local part = gui.Parent

local speed = 0

local function setVelocity()
    part.LinearVelocity.VectorVelocity = Vector3.new(speed,speed,speed) * part.CFrame.LookVector
end

-- 前進ボタン
gui.SpeedUp.MouseButton1Click:Connect(function()
    speed += 1
    setVelocity()
end)

-- 後退ボタン
gui.SpeedDown.MouseButton1Click:Connect(function()
    speed -= 1
    setVelocity()
end)

-- 左ボタン
gui.LeftTurn.MouseButton1Click:Connect(function()
    part.AngularVelocity.AngularVelocity = Vector3.new(0,1,0)
    wait()
    part.AngularVelocity.AngularVelocity = Vector3.new(0,0,0)
    setVelocity()
end)

-- 右ボタン
gui.RightTurn.MouseButton1Click:Connect(function()
    part.AngularVelocity.AngularVelocity = Vector3.new(0,-1,0)
    wait()
    part.AngularVelocity.AngularVelocity = Vector3.new(0,0,0)
    setVelocity()
end)